I came across some fantastic video clips not to long ago on the British Pathe. The ones that interested me the most were suggestions for making mends to items you had during the rationing of World War II. Like the one titled FASHION HINTS (aka PATCHWORK & HATS) . This clip inspired me to do the following project:
Here is how I did it:
I've had this wool hat laying around that I've felt is in need of revamping.
I popped off the flower and felt ribbon from the crown and the grosgrain ribbon from the inside. I then marked a half inch up from where the brim met the crown.
I separated the crown and brim from my mark. Then used a fine sanding block and sanded the wool in a circular motion to remove the dust and to get rid of the fluffs that have occurred over the years.
I marked about every two inches around the inside of the brim and took a soft pleat at every other mark.
Thankfully at my work I have a hefty machine that I could stitch through the wool with. I stitch a 1/2" in from the inside edge. I then slightly steamed the wool with my iron, not actually touching my iron to the wool, but just adding some steam and using my hands to press the pleats in.
Using some off-white tulle with polka dots I had in my stash, I cut a piece that was 10" wide by about 36" long. I folded it over width wise so that it was 5" wide, overlocked the edge and flipped it right side out. I off centered my sash, knowing that I'd be wearing the hat to one side, over the hole and took a small pleat on the two sides .
Reverse side with tulle stitched in. I used the sandpaper again to brush off the chalk marks.
Isn't it fun?! I love that it has the fun ripple effect when you wear it to the side. It is great to be creative with what you already have in times when you don't have alot of extra to spend on new things.
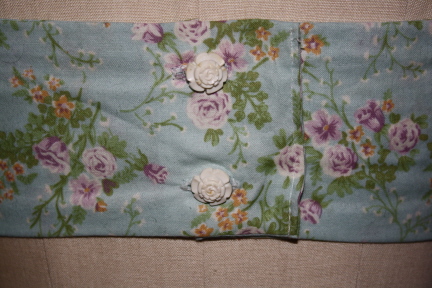
I needed an instant gratification project. So when I came across this Vintage Beach Bra Top on Etsy from Mrsdepew of A Few Threads Loose, I knew it would do just the trick. Boy was I right!! The best part, its a pdf!! So no waiting for Mr. Postman.
I picked up a yard of cotton in a sweet print to match my new green necklace on my way home yesterday...I was so excited that I almost skipped washing my fabric. Lucky for me I needed to do some laundry so I threw it in the wash. Good seamstress.
I got it cut out last night. Isn't the pattern fun? Almost all the instructions are printed on the pattern with detail illustrations.
Got all my darts in. I'm not a fan of stitching darts...this one had 12 total between the self and lining! But the right placement of perfect darts does so much for structure. These are placed just right!
Searched through my box of vintage buttons...the best purchase I ever made was a box of 700+ vintage buttons that contained many lovely sets. Aren't these darling flowers just perfect for this fabric?
And Done!!!!
Now if only the 80 degree weather would come back!!!
My hubbie even suggested I make a matching pair of shorts to go with...guess I'll be running back to get more of this fabric. Once I get the matching shorts done and the gloomy gray skies disappear I'll post a shot of me wearing the set.
Today I went to the Long Beach Antique Market with my good friend Joan. I gave myself a budget and, on this trip, I had nothing specific in mind that I was searching for. I found myself mostly attracted to all the lovely jewelry booths! And oddly enough various shades of green...I guess I might be moving away from my blue phase. Lately I have felt that my jewelry box has been lacking in variety so I am glad that I've added some beautiful new pieces.
I know that I love to look at pretty pictures online of vintage stuff...so I thought I'd share with you some of my purchases! So time for some eye candy...
Found these at my favorite jewelry booth...then picked out a necklace they had to make a fun little set.
What a great set...at another one of my favorite booths where they have $5, $10, and $20 table. This set was on the $10! Score.
I love brooches...and this one was large, such a fun color and on the $5 table.
These were on the $5 table as well...and although not the perfect match, I think they'll still be fun paired together til I find something better to go with each.
This was the best find of the day! The bracelet I got at one booth, I just loved the rustic chain and the open mouthed fish. Then at my favorite jewelry booth I found the earrings which perfectly matched the coloring and design of the stone in the bracelet! Perfect.
How could I pass up that cute fishy?! Now to make a fun fishing themed dress to go with!
I've been trying to come up with new ideas for dresses I'd like to create for myself and as I was watching a classic movie I thought to myself, "I could easily recreate that to fit with my style!" So I will be creating some of my blogs based on future projects that I'd like to create. I will include my inspiration, with as many images of different angles that I can find, and of how I will incorporate that into something that fits my style. Hopefully not too long after coming up with my inspirations I will have an opportunity to create said design!
I don't want to start with my original inspiration for this line of projects because I'm saving it for later in the year when I really have time to focus on it. So I will start with my second idea...Audrey Hepburn's Ascot dress from "My Fair Lady."
This dress is just amazing - the fit, the use of black and white stripes, the balance of hat, bows and lace. This entire scene is one of my favorite for ogling costumes...especially hats. Cecil Beaton's color palette draws even more attention to the lines used in the costumes and hats, which adds just another layer to the point that is being stressed in this scene of the movie. Sorry the costume designer in me is gushing...back to being inspired.
A sketch by Cecil Beaton for the Ascot scene
In my search for images of this costume I came across Debbie Reynold's 2011 Auction of Motion Picture Items that she has collected over the years. She did a few short highlights on some of the items and one of them just happened to be this dress...what a great way to see even more details of this dress!
Now to take this look and adapt it to my look of the 1950s and early 1960s. I researched some patterns and came up with these ideas.
I like that this one has the center panel to create the fitted bodice and bring the bows into, like the original inspiration.
This pattern is also great because of the detail at the hips, which could be done in the black and white striped fabric.
This is my favorite pattern for recreating this dress. I love how view A has the flounce to mimic that in the original inspiration.
These two would also be a great design due to the fact that it brings the flounce/fishtail to the back, which is closer to the original inspiration. However I like the more dramatic affect of the previous pattern's flounce (or even the smaller flounce in the gold skirt of the previous pattern) so I'd probably go in that direction.
And rather then using lace, like the original, I'd like to use a silk damask in white that has a similar pattern to the gold dress above.
The details of my dress:
- 3/4 length sleeves
- Neckline that hits at the collar bone
- Very fitted to the knee with a flounce or fishtail, with the possibility of changing the fabric in the flounce to a lace or netting.
- Bringing the detail of the black and white ribbon and bow in at the hips, just above the bust line, and at the flounce.
- Fabric in a while silk damask or brocade with some possible lace details at the neckline, bottom of sleeve and on the flounce.
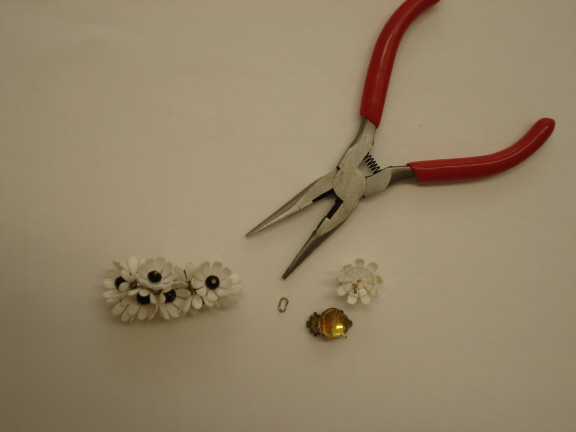
You know how there is always that box of random, odd bits and bobs at thrift stores, antique malls or the swap meet? I like to rummage through those bins in search of some hidden treasure or to find something I can rework. Not too long ago I was at the Long Beach Vet Swap, and I found myself searching through the bins of jewelry that were missing their mate, stones, etc. I came across this dangly flower earring and instantly knew I could divide it into two.
So I pried the flower off the earring base with my handy pliers and opened the jump ring to separate the group of flowers from the earring base.
Recently I was very happy to come across earring posts that have the vintage style screw back, I prefer them over clip on because you can adjust the pressure. So I grabbed my E6000 adhesive and put a dollop on the inside of one of the flowers to cover the front of the earring post.
I had to figure out a way to allow the glue to dry without placing the earring down so that the flower wouldn't move on the post. I found that a clothespin did just the trick.
While that was drying I divided the large cluster into two evenly distributed groups of six flowers for each. Using one of the existing jump rings I attached each cluster to the ear screws' loops. Presto-Chango!! I made one earring into two. I'm thinking I might get a jet black flatback Swarovski crystal to place in the middle of the flower that is on my ear to compliment the ones that are dangling.
So for Mother's Day my sister asked that I put together some sort of fruit dish for the brunch she is hosting. I searched my favorite food blogs and came across a Simple Lemon-Strawberry Parfait.
Phase 1: Wednesday night I whipped up the Microwave Lemon Curd...probably the simplest thing I've ever made. It was absolutely divine and I've decided I need to keep this around all the time.
Phase 2: The recipe gave the option for a purchased pound cake, which would make it simpler, or a homemade one. I, of course, choose to make one. So Saturday morning I made a Condensed Milk Pound Cake from the same food blog. Of course, as soon as it cooled I cut off a slice and smothered it in the Lemon Curd.
Phase 3: Saturday night I preped everything for the next day and of course threw a couple together as testers to enjoy before the big day.
I whipped up my own cream, cut up some strawberries, and pulled out the Lemon Curd.
I cut up my pound cake into nice little circles to sit down into my chosen serving dishes.
Beautiful. Displayed in my "vintage themed" Special K juice glasses...and the theme seems appropriate for Mother's day.
They also look great in my vintage teal frosted juice glasses!
The boys absolutely loved them. Hopefully mom will too!!


 Isn't it fun?! I love that it has the fun ripple effect when you wear it to the side. It is great to be creative with what you already have in times when you don't have alot of extra to spend on new things.